Groups are a powerful option in Contact Wolf that allow you to assign records to a Group that you create.
Records assigned to any group can then be listed by selecting the group from the Group Selection Control.
Simply click on the Group Name in the Group Selection control to list only records for the Group selected.
NOTE: When a Group is selected you are only working with a subset of your total records that have been
assigned to that Group. To work with ALL the records in your database click on the *ALL* group which always
includes ALL records in your database by default.
You can assign a record to belong to a maximum of 4 Groups.
How to use Groups or Categories to group your contacts :
Contact Wolf provides 3 separate directories (personal, business, custom) for you to separate particular contact record types. However it also provides a powerful option to categorize or group your contact records. You can create Groups (categories) for each separate directory and assign each contact record to up to 4 groups.
Groups allow you to easily list only the contact records that belong to a particular Group.
For example : You may want to create a group named "Clients" in the Business directory. You can create groups by 3 different methods in Contact Wolf.
WAYS TO CREATE GROUPS:
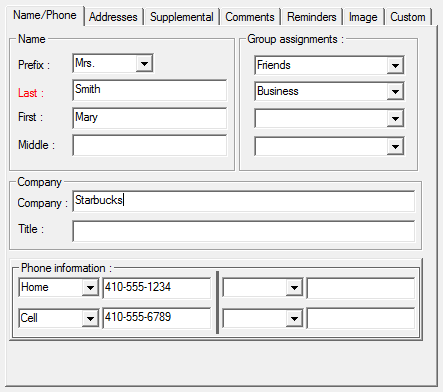
1) Click on the Add/Edit Record button in the left window pane of Contact Wolf to add a contact record.. Simply enter the Group name in one of the 4 Group Assignment boxes. If the Group does not already exist it will be automatically created for you. Once A Group is added to your Groups List it will be available from the drop down menu next to each Group Assignment box by clicking on the down arrow.
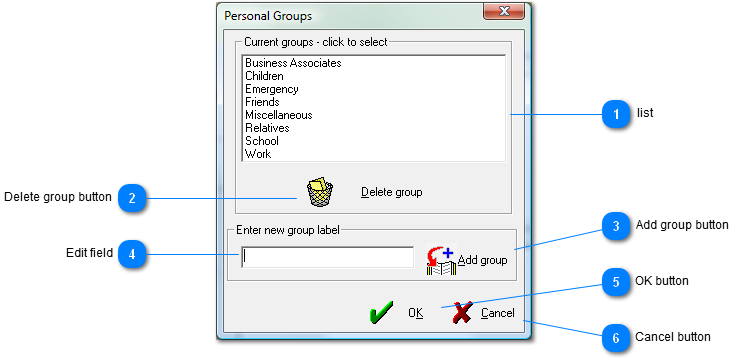
2) Click on the "+/-" button to the right of the SEARCH button at the top of the Contact Wolf main window. This will open a window where you can Add/Delete Groups.
3) Right click in the Groups List Window directly to the left of Records List (where the Names of the records are displayed) and select ADD from the popup menu.
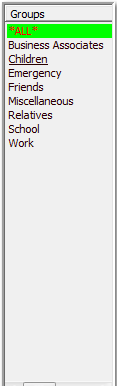
Groups List Control Window Control
RIGHT CLICK In Groups Control to see popup menu of options
NOTE: If you do not see the GROUPS Control you may need to enable it by selecting:
Preferences->Interface Options->Group Control->Enable
TIP: Groups are Directory specific which means the group you create only exists in the Directory (personal, business, custom) that is selected when its created. This way you can have many different groups for each Directory.
NOTE: ALL records automatically belong to the "ALL" Group. If you click on the Group named "ALL" in the Groups List Box it will display all records for the currently selected Directory (personal, business, custom).
Once the Group is created it will also appear in the drop down menu to the right of each Group Assignment box when you Add/Edit a record. So to assign the category "Clients" to any other records simply Add/Edit the record and click on the small down arrow next to one of the 4 Group Assignment boxes and select "Clients" from the drop down menu.
HOW TO LIST ONLY RECORDS FROM A GROUP:
Once you have assigned the "Clients" category to several records you can easily list and select only your "Clients" contact records by:
1) Click on the "Clients" Group in the Group List box. This will display any records currently assigned to this Group.
2) Enter the Group name in the SEARCH Box and then Click on the SEARCH button, only records from the "Clients" group assignment will be listed.
TIP: If the "Clients" records are not listed make sure you have the Categories enabled in the Search options by clicking on the "?" button next to the search phrase box.
Now that you have only the "Clients" records listed you can "TAG" or select all the "Clients" records by clicking on the "TAG ALL" button located below the Records List where the record names are displayed. Once you have the records tagged you have several options:
1) Print a Report of the Tagged Clients records
2) Send Email to the Tagged ( Clients) records
3) Print the tagged Clients records to labels
4) Export the tagged Clients records into many different formats (WORD, xml, Excel, text file, etc)
5) Create an HTML page for the Tagged Clients records that you can upload to your server so you have access to their contact information from the internet
You can assign a contact record to a maximum for 4 different groups, ie., each record can belong to 4 different categories or groups. So you may want to create another category named "Friends" and assign it also to some of the "Clients" records if appropriate. Then if you want to list only records that belong to both the "Clients" and "Friends" categories you would:
1) Enter into the SEARCH Phrase box
Clients + Friends
Groups (categories) are a powerful way for you to group records in Contact Wolf. Grouping records allows you to List and TAG the records and perform many different functions on the group.
HOW TO ASSIGN MULTIPLE RECORDS TO A GROUP:
Often you may need to create a new Group and assign multiple records to it. Contact Wolf makes it simple.
1) Method #1
Click on the ALL Group in the Group selection box to list ALL records.
Click on the letter tab A-Z to list records alphabetically
Hold down the Ctrl Key and click on any records to be added to the group
Right click and select "Assign Selected records to Group"
2) Method #2
TAG all the records you would like added to the Group
Right click in the list where the Names of the records are displayed and select "Assign Tagged records to Group"
TIP: To clear the Tagged Records List click on the "Show Tagged Records toolbar button  and select Clear All.